Make a pillow that doubles as a gift package! Give your recipient this pillow and stuff all their presents inside the zippered pocket. There is another zipper which allows the cover to be taken off of the pillow form. Don't be intimidated if you've never sewn in zippers. This is the perfect project to try it on, and it's actually really easy! Just think of it as another piece of fabric. It just happens to have a pull and teeth! One thing to note: if you get an all-purpose zipper with nylon teeth, your machine can actually sew right through it! The only thing you need to avoid is your sewing machine needle hitting the little metal stoppers on either end of the zipper. If you get an all-purpose zipper with nylon teeth, your machine can actually sew right through the teeth!
What you need:
1/2 yard woven fabric such as quilting cotton, canvas, or similar fabric. I used this Dear Stella print.
1/3 yard woven fabric for pocket lining
Two 14" zippers
Thread
16" pillow form
Sewing machine with zipper foot
Pieces to cut from outer fabric:
Pillow back 16 x 16"
Pillow front large panel 13 x 16"
(2) Pillow front small panels 2 x 16"
(4) Zipper end tabs approx. 4 x 5"
Pieces to cut from pocket lining fabric:
(2) Lining pieces 10 x 16"
|
 |
Directions:
First you are going to put the zipper end tabs on the ends of the zippers. Start with one of the 4 x 4" squares, and fold it in half width wise, right sides together. Press.
Lay the folded tab on top of the end of the zipper, so that the fold is running vertically, and on the side toward the zipper teeth. Place it so that the folded edge is covering the metal teeth, and in toward the middle of the zipper teeth by at least 1/4". You are going to sew right along this folded edge and you just need it to be far in enough that you can safely sew without hitting those metal stoppers. Pin all four tabs down on the ends of both zippers. Pin in place, and stitch close to the folded edge. You will sew through the nylon teeth; this is okay.
At this point, you can trim off the extra fabric from the top and bottom of these tabs, to make them equal to the zipper, just extending the zipper length. I actually left mine alone though and they are not seen.
Next, you are going to attach the zippers to their surrounding pieces. If your zippers are different colors like mine, decide which one you want to be on top (which will lead to the pocket), and which one you want to be on the bottom (leading to the inner pillow form). Start with the one you want to lead to the pocket. I'm using the light pink one for this part.
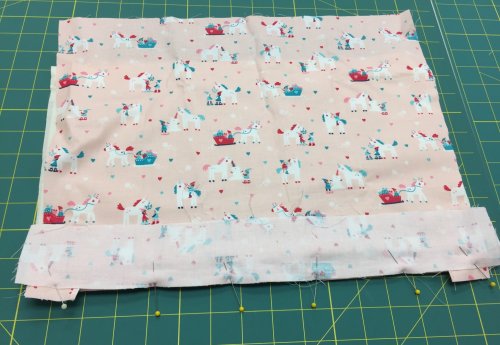
Lay down one of your lining pieces, right side up. My white lining fabric doesn't have a directional print, but if it did, you would want your printed images to be upside down. Now lay your zipper face up on top of this piece. Align the lining piece raw edge with the very top of the zipper as shown in the photo below. Finally, lay your pillow front large panel, right side down, on top of the other two items. Your print should be upside-down, like my unicorns. Make sure all three items are aligned at the top edge and pin in place.
It should also be aligned at the side edges, unlike mine at the time of this photo (oops!). It should be completely covering the lining piece at the side edges. See how mine also has extra fabric sticking up on top? You can choose to cut off that excess fabric as I mentioned earlier, if it helps you line it up, but it's not really hurting anything so I didn't.
Attach your zipper foot to your machine. Sew next to the zipper teeth 1/4" from the raw edge.
Now, fold both of the fabrics upward and away from the zipper. You should now have the lining fabric on the bottom of the stack, followed by the zipper, and then the outer fabric, print side up, and unicorns (or whatever your print is) right-side up. The top half of the zipper tape is attached to these fabrics, but the bottom half is not yet attached to anything. That's what we are going to take care of next.
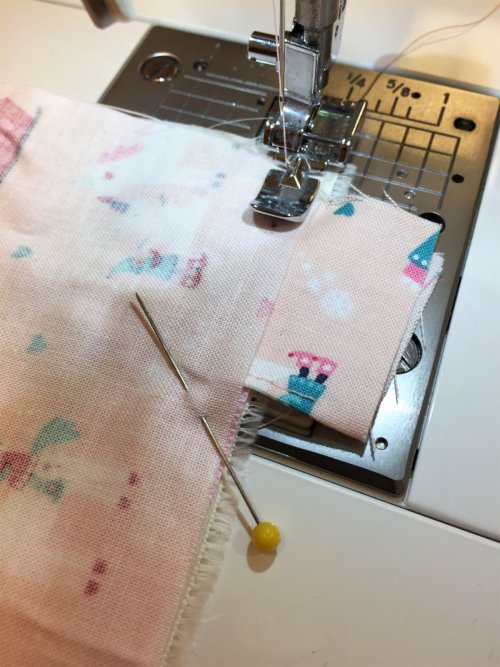
Lay your second pocket lining piece right side up. If it has a print, you will want them going the right direction for this step, not upside-down. Next, align the bottom edge of the unsewn zipper tape to the bottom edge of the lining pocket piece. On top of that, lay one of the front small panel pieces, right side down, and print upside-down, as shown below.
Pin in place along this bottom edge...
 |
 |
And sew with 1/4" seam allowance. Fold the front small panel down and away from the zipper, and push the pocket lining piece upward.
|
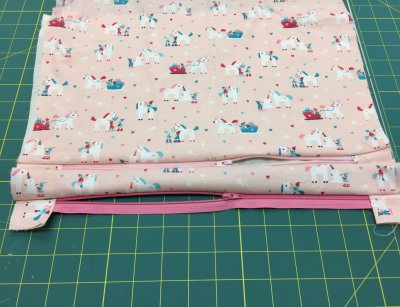
Now to attach the second zipper. Lay the second zipper face down on top, aligning the bottom edge with the bottom raw edge of the small front panel.
|
|
I accidentally put my zippers so they zipped the opposite ways. If this would bother you, make sure both zipper heads are at the same side. The second zipper does need to be partially opened in an upcoming step, but it didn't need to be here. If they would have been both closed, it would have been easier to catch.
Pin along the bottom edge and sew. Fold the zipper tape down, and away from the fabric, so it is now face up, like so...
|

|
Next, lay your finall front small panel on top of the zipper tape, face down and print upside-down, aligning at the bottom edge.
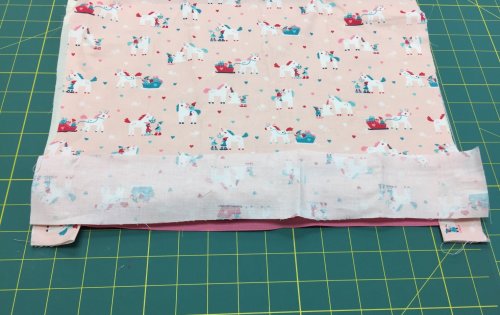
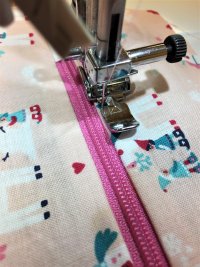
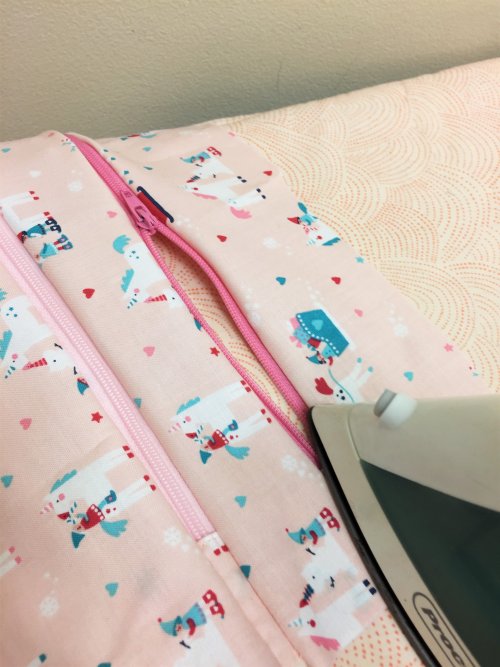
If your edges are uneven from sloppy cutting, like mine, we'll trim those soon. First we're going to top stich along both zippers. For this part you'll just want to follow the instructions carefully, making sure your pieces are where they need to be so you don't sew through them. First, get your iron and press along both zippers from the front and back. Pull the fabric tightly away from the zipper as you do this, then we'll stitch in place which will make it look nice and clean, and keep the fabric out of the way when the zipper is used.
Now when you sew the top stitching for each of the zippers, do it in this order and make sure everything is placed correctly before you sew so you don't accidentally sew through your pocket lining pieces.
First, push both pocket lining pieces away from the pocket zipper. The one attached to the top half of the zipper tape should be going up, and the one attached to the bottom half of the zipper tape should be going down. When you look inside the pocket zipper you shouldn't see any lining fabric. Now do the top stitch only on the top half of the zipper tape.
Next, fold up the pocket lining piece that is attached to the bottom half of the zipper tape. Now when you look into the zipper pocket you should see lining fabric. Now top stitch the bottom half of the zipper tape.
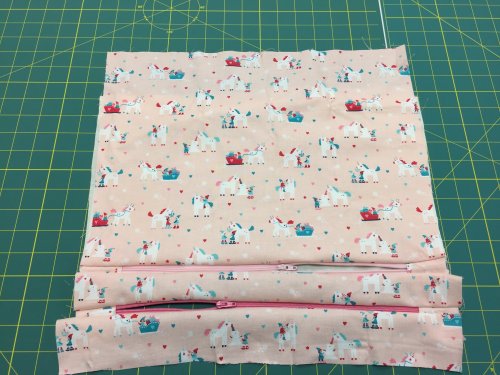
Now the pocket lining pieces are both pushed up and out of the way, so you can safely do both top stitches on the lower zipper.
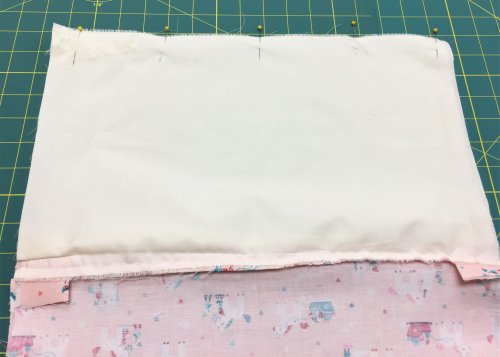
Now flip over the whole piece, and align the two pocket lining pieces at the top edges. Pin and sew with a 1/2" seam allowance
|
Pin along the bottom edge and sew.
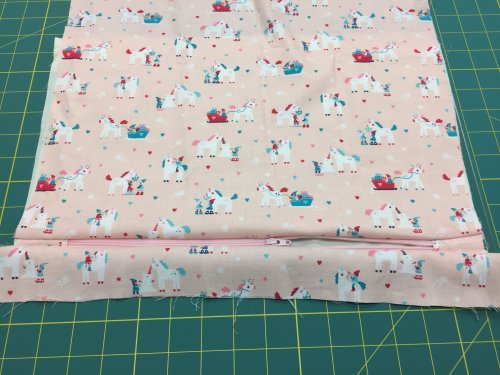
Fold this newly attached front small panel down and away from the zipper, and you should have what looks like this...
  |
N
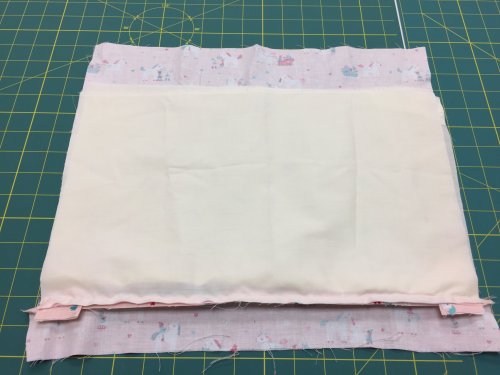
ow the pocket piece is complete except for the sides. The sides will get closed in the same seam as when the front and back get attached. Next you need to open the bottom zipper up (the one that leads to the inside of the pillow). Put your newly completed pillow front and your pillow back piece right sides together. Pin all the way around and sew with 1/2" seam allowance. Finally, cut the extra bulk off of the corners using a diagonal cut with your scissors.

Now you can flip the pillow right side out through the open zipper.
Put 16" pillow form inside, stuff the other pocket with presents, and enjoy gifting them to anyone on your list!


